|
Buster
A
cheap guitar speaker and amplifier that's perfect for the beginner
Introduction
The good news - got a
free electric guitar - a Gibson Epiphone Junior.
The bad news - no
one plays the guitar in my house and I really don't want to spend
the money on equipment that may end up not being used.
The solution? Build
something cheap that can bridge the learning curve gap. If
nothing comes of it, it's no big loss. If someone (me?) ends up
loving the guitar, we can always upgrade the amp.
After a little
hunting on the internet, and a little shopping in my spare parts
bin, the solution became obvious. Here are the basic components
that make up my guitar speaker and amp.
-
The Noisy
Cricket preamp. This little gem is easy to assemble and is
powerful enough to drive a speaker directly for low-volume
(personal space) use.
- Since I
wanted a little more volume, I'm going to use a spare JBL PC speaker
amplifer from my parts bin. This is the same amplifier I previously
used on my CanCan project. There are
many other possible choices here. Any amp from an old PC speaker would work;
as would any of the chip amps on the market. I took the path of least resistance.
- For the speaker,
I'm going to use a 5
inch Peerless 831990 driver. I have 4 of these collecting
dust so I might as well put one into service. I also have a Lineaum
monopole driver sitting around so I'll combine the two. The result
will should give more range than the guitar needs.
- To house everything,
a simple plywood box will do. It's covered with heavy duty fabric and
metal corners. My only concern is with the cat - will she use the
fabric like a scratching post?
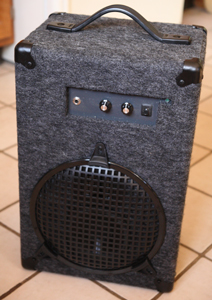
The picture above
shows the front and back of the finished amp. You can see all of
the controls and features (through I have not labeled them). Items
worth noting are:
- A top mounted
handle - collapes down when not in use.
From PartsExpress.com
- Heavy duty fabric
and metal corners - from PartsExpress.com
- A 10 inch metal
grill to cover the 2 drivers underneath - from PartsExpress.com
- A 1/4 inch input
jack for the guitar cord
- A gain knob. This
goes to the Noisy Cricket circuitry.
- A tone control know.
This goes to the Noisy Cricket circuitry.
- A "grit"
switch for the Noisy Cricket circuitry.
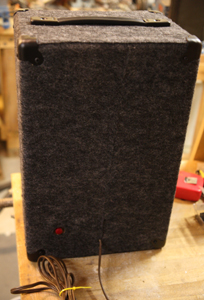
- A green power LED.
- A red pushbutton
power switch on the back.
- A power cord.
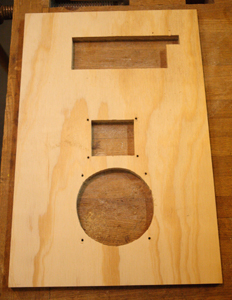
Construction
There are two parts to
the build process - a 5-sided box and the front baffle. The front baffle
containts almost everything. The only thing that's part of the 5-sided
box is the power transformer and power switch. Components such as the
knobs can't be mounted onto 1/2 inch plywood (too thick) so they are
mounted on a piece of hardboard. The hardboard is then mounted into
the cutout on the baffle. This structure has the added benefit of allowing
the controls to be recessed and thus less likely to he damaged.
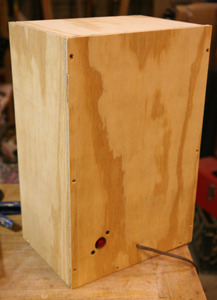
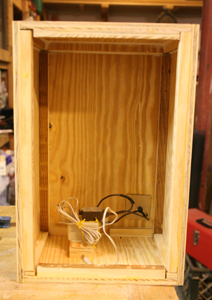
The pictures below show the
5-sided box.
Note that the original plan called for the case to have square edges.
After I received the metal corners, I realized that I had to round over
the edges with a 3/8 inch radius. This forced me to remove the screws
and reinforce the interior edges. The roundover was applied after
everything was assembled and is not reflected in the pictures below.
The power switch is
recessed in the rear for two reasons - (1) to avoid running 110VAC to
the front panel near the other components and injecting noise and (2)
to keep it out of the way. The switch is also mounted on a piece of
hardboard which is in turn glued and screwed into the plywood.
The transformer is a
wall-wart that's been kept intact. An old extension cord was hacked
so that the wall wart could be plugged into it. Should I ever decide
to scrapt this guitar amp, I can recycle the transformer easily.
The front baffle
holds the drivers, the crossover, and the electronics. This setup
allows me to test everything before assembling the box. Once assembly
is done, there's really no good way to open up the box again so it's
important that everything is tested before assembly.
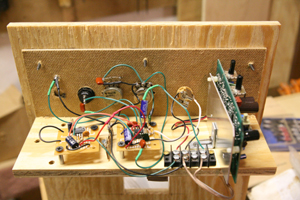
To mount the
electronics, a piece of plywood is mounted at right angle to the
baffle. The picture on the left shows the various components and
the wiring mess. The two small boards on the left and center are
the power supply and Noisy Cricket. The main transformer delives low
voltage AC to the JBL amp which converts it to DC and filters it. The
power supply on the left takes DC power from the JBL amp board to
regulates it to about 9.5v to power the Noisy Cricket. It uses a
LM317 variable regulator to do the job. The JBL amp has
its volume control set to close to maximum. The tone control is
set to the middle position. These will remain unchanged and
inaccessible once the unit is assembled.
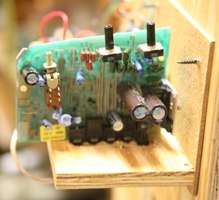
The JBL board is
mounted vertically because that's the easiest way for me to mount
this particular assembly. It comes with its own metal heat sink. I
used a small right angle bracket to connect the heat sink to the plywood.
I don't have pictures
of the crossover boards. There are two of them, one for the woofer and one
for the tweeter. The are mounted behind the baffle, adjacent to the
tweeter on either side. The woofer network is a 4th order low pass with
a corner at about 2KHz. The tweeter is a second order high pass at about
1400Hz. Tweeter response is padded with a 4.7 ohm resistor. The summed
response is pretty good as measured with LAUD. With an estimated internal volume of about 0.7
cubic feet, the predicted low end response is F3=67Hz, F10=38Hz. Not bad.
The upper end is a little soft as the monopole has a slight droop in its
response. But the treble is fairly clean and pleasant to listen to.
Once everything has
been tested and the unit is assembled, the last step is to roundover
the edges and apply the fabric. I used 3M #77 spray adhesive to glue
one continuous piece of fabric to the box. Holes were cut for all
openings on-the-fly and trimmed with a sharp pair of scissors. The
drivers were mounted over the fabric. The corners and grill were
installed last.
Conclusion
I am very pleased
with the results. The amp plays loud enough to be annoying yet can be
turned down for quiet playing. The unit is solid and best of all, was
cheap enough given the number of spare parts I already had on-hand.
The only bad thing is that the cat has indeed found the fabric to her
liking but it's really tough stuff and so far, there's been no
damage... yet.
|